


Changing your car’s air filter regularly is like giving your car fresh air. Over time, the filter gets clogged with dust, dirt, and other particles. If you don’t replace it, your engine can’t “breathe” properly, leading to many problems. Think of it as trying to run a marathon while breathing through a straw—it won’t end well. Most experts suggest changing the air filter every 12,000 to 15,000 miles or once a year, but always check your owner’s manual for specifics.
Impact on Engine Performance
A clean air filter is crucial for optimal engine performance. When your engine gets the right amount of clean air, it burns fuel more efficiently. This means better acceleration, smoother rides, and even improved fuel economy. Conversely, a dirty filter can cause poor acceleration, reduced power, and even engine misfires. It’s amazing how such a small component can greatly impact how your car runs.
Cost Savings from DIY Replacement


Let’s be honest: car maintenance can be expensive, but changing your air filter is one of the cheapest and easiest tasks you can do yourself. If you’ve ever had a mechanic replace it, you might’ve noticed the markup on the part and labour. Doing it yourself can save you a good chunk of change. Plus, you’ll avoid those awkward upsells at the shop. With just a few tools and a new filter, you can do it in under 10 minutes, keeping more cash in your pocket for other things.
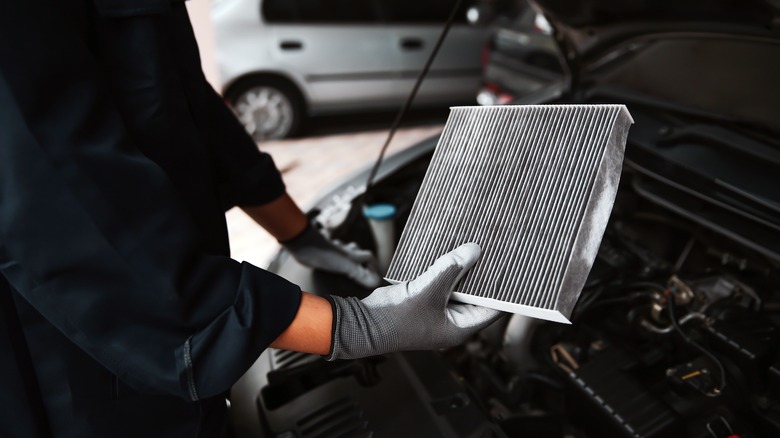
Tools and Materials Needed for Air Filter Replacement
Essential Tools for the Job
Changing your car’s air filter is one of those maintenance tasks that doesn’t require many tools. Here’s what you’ll typically need:
- Screwdrivers: Both flathead and Phillips screwdrivers are often necessary to open the air filter housing. Depending on your car model, you might need one or both types.
- Pliers: Handy for loosening any clips or clamps holding the air filter in place.
- Ratchet and Socket Set: Sometimes, the air filter housing is secured with bolts, so having a basic ratchet set can be a lifesaver.
- Gloves: Not only do they keep your hands clean, but they also protect you from sharp edges.
- Shop Rag or Cloth: These are useful for wiping out dust or debris from the air filter housing before installing the new filter.
Choosing the Right Replacement Filter
Before you even think about swapping out your air filter, ensure you have the right replacement. Air filters come in different shapes and sizes, so getting one that fits your car’s make and model is crucial. Here’s what to consider:
- Size and Shape: Filters can be flat, rectangular, or conical. Check your current filter or your car’s manual to determine what you need.
- Quality Options: You can choose between OEM (Original Equipment Manufacturer) filters, which are generally more affordable, or premium options that might offer better performance.
- Vehicle Specifications: Always double-check your car’s year, make, and model to ensure you’re getting a filter that fits.
Safety Gear and Precautions
While changing an air filter is relatively straightforward, it’s always smart to take some basic safety precautions:
- Cool Engine: Ensure your car has been off so the engine isn’t hot. You don’t want to burn yourself while working.
- Secure the Hood: Use the prop rod to keep the hood open securely. The last thing you need is the hood crashing down while you focus on the engine.
- Work in a Well-Ventilated Area: Ensures you’re not inhaling any dust or fumes while you work.
Having these tools and materials on hand will make changing your car’s air filter a breeze. This will save you time and money while keeping your engine running smoothly.
Step-by-Step Guide to Changing Your Car’s Air Filter
Preparing Your Vehicle for Maintenance
First, make sure your car is parked safely. Turn off the ignition and set the parking brake. It’s best to work on a cool engine, so give it a few minutes if you’ve just driven. Once you’re ready, pop the hood and secure it with the prop rod. Now, gather your tools. You won’t need much—just a screwdriver, maybe a pair of pliers, and your new air filter.
Locating the Air Filter Housing
Finding the air filter housing is usually pretty straightforward. Look for a black plastic box near the engine. It’s often on the top or slightly off to the side. If you’re unsure, trace the large air intake duct from the front of the car to the engine, and you’ll find it. The housing might be held together with clips or screws, so take note of how it’s fastened.
Removing the Old Air Filter
Removing the old filter is simple once you’ve opened the air filter housing. Carefully pull it out, making sure not to let any dirt fall into the housing. Wipe out the inside with a clean cloth to remove any dust or debris. Keep the old filter handy to compare it with the new one to ensure you’ve got the right replacement.
Installing the New Air Filter
Ensuring a Proper Fit
Alright, you’ve got the old filter out, and now it’s time to pop in the new one. First things first, make sure the new filter matches the old one. You don’t want to force a filter that doesn’t fit. Check the size and shape—they should be identical. If they look the same, you’re in business.
Before you put it in, quickly examine the filter housing. Make sure no dirt or debris is hanging around in there. If there is, give it a quick wipe-down. Nobody wants that stuff getting sucked into the engine.
Securing the Air Filter Housing
Once the new filter is snug in its place, it’s time to close up the housing. Depending on your car, this might mean snapping a few clips back into place or tightening some screws. Whatever it is, make sure everything is secure. A loose housing can let unfiltered air into the engine, and that’s a problem you don’t want.
Double-check that everything is sitting right. If the housing isn’t sealed properly, you’ll have issues down the line. Please give it a little shake to make sure nothing’s rattling around.
Testing the Installation
Now that everything’s buttoned up, please don’t slam the hood and call it a day. Start the engine and let it run for a minute. Listen for any weird noises – whistling or rattling can signal something’s wrong with your installation.
Take a quick drive around the block. This will help ensure that everything is functioning as it should. If the engine runs smoothly and you don’t hear anything unusual, congratulations! You’ve successfully installed your new air filter. If something seems off before hitting the road, it might be worth double-checking your work.
Common Mistakes to Avoid When Changing an Air Filter
Avoiding Dirt Contamination
When swapping out your car’s air filter, it’s important to keep everything clean. Even a bit of dirt can sneak into the engine and cause problems. To avoid this, ensure the area around the air filter housing is clean before opening it up. Use a damp cloth to wipe away any grime or dust. Also, when you remove the old filter, be careful not to shake it too much. You don’t want dirt falling into the housing.
Choosing the Correct Filter Type
Not all air filters are the same, and using the wrong one can mess with your engine’s performance. Filters come in different sizes, shapes, and materials, so picking the right one for your vehicle is crucial. Check your car’s manual or consult a parts specialist to ensure you get a filter that fits your car’s specifications. Avoid using a filter just because it’s cheaper or more readily available.
Ensuring Proper Reassembly
After putting in the new air filter, you need to ensure everything goes back together correctly. It’s easy to forget a clip or misalign a cover. Double-check that all screws, clips, and fasteners are secured tightly. If the air filter housing isn’t closed properly, unfiltered air can enter the engine, which defeats the whole purpose of changing the filter. Give everything a little tug to ensure it’s secure before you finish. Once done, start the engine to ensure it runs smoothly without any strange noises.
Maintaining Your Car’s Air Filter for Longevity
Regular Inspection Tips
Keeping an eye on your air filter is key to making it last longer. Aim to check it every few months. It’s simple—pop the hood and take a look. If you see a lot of dirt or debris, it might be time to consider a replacement. Some folks like to use a flashlight to see if light passes through the filter. If it doesn’t, that’s a good sign it’s clogged. Regular inspections help catch issues early, saving you from bigger problems.
Signs Your Air Filter Needs Replacement
Your car will give you hints when the air filter’s had enough. You might notice the engine running rough or a drop in fuel efficiency. Sometimes, you’ll even hear a strange whistling sound. If you catch a whiff of fuel or see black smoke from the exhaust, that’s a red flag, too. And don’t ignore the check engine light—it could be trying to tell you something about the air filter.
Benefits of Routine Maintenance
Staying on top of air filter maintenance is a win-win. For starters, it keeps your engine running smoothly and efficiently, which means better gas mileage and fewer trips to the pump. Plus, a clean air filter helps reduce emissions, so you’re doing your bit for the environment. And let’s not forget that regular maintenance can save you money by preventing costly repairs. It’s all about keeping your car happy and healthy in the long run.
Troubleshooting Air Filter Issues
Identifying Symptoms of a Clogged Filter
You might not think about your air filter much, but your car will let you know when it gets clogged. Here are some signs to watch out for:
- Reduced Fuel Efficiency: If you notice you’re stopping at the gas station more often, a clogged air filter could be the culprit. It makes your engine work harder, burning more fuel.
- Power Loss: Ever feel like your car’s not as peppy as it used to be? A clogged filter restricts airflow, which can sap your engine’s power.
- Strange Engine Noises: Listen for coughing or popping sounds from your engine. These noises can indicate your engine isn’t getting enough air.
Check Engine Light Warnings
The dreaded check engine light can mean many things, but a dirty air filter is one of the simpler fixes. Here’s what to do:
- Scan for Codes: Use an OBD-II scanner to check for error codes. If you see codes related to the air intake or mass airflow sensor, your air filter might be the issue.
- Visual Inspection: Pop the hood and examine the air filter. If it’s dark and dirty, it’s time for a change.
- Replace and Reset: Swap out the old filter for a new one, then reset the check engine light. If the light stays off, you’ve likely solved the problem.
When to Seek Professional Help
Sometimes, even with the best DIY efforts, you need a pro. Consider getting help if:
- Persistent Check Engine Light: If the light comes back on after replacing the filter, there might be a deeper issue.
- Unusual Engine Behavior: Persistent rough idling or stalling could mean something more serious.
- Complex Vehicle Systems: A mechanic might be better equipped to handle the job if your car has a complicated air intake system.
Frequently Asked Questions
How often should I change my car’s air filter?
Changing your car’s air filter every 12,000 miles or once a year is a good idea. If you drive in dusty places, you might need to do it more often.
What happens if I don’t change the air filter?
If you don’t change the air filter, your car might not run as well. This can lead to poor gas mileage and even cause the engine to act up.
Can I clean and reuse my car’s air filter?
Some air filters are made to be cleaned and used again, but most are not. It’s usually best to get a new one when it’s dirty.
How do I know which air filter to buy for my car?
You can find the right air filter by checking your car’s manual or asking at an auto parts store. They can help you pick the right one for your car model.
What are signs that my air filter needs changing?
If your car uses more gas than usual, runs rough, or the check engine light comes on, it might be time to change the air filter.
Is changing the air filter a job I can do myself?
Yes, you can change the air filter yourself. It’s pretty easy and doesn’t require much time or special tools.