


Got some old tools looking a bit sad with rust? It happens to the best of us. Before you toss them out, consider giving them a new lease on life. We’re going to look at two popular ways to tackle rust: the simple kitchen staple, vinegar, and the more involved method of electrolysis. Both can bring your rusty tools back from the brink, but they have their own quirks. Let’s figure out which one might be best for your next restoration project.
Key Takeaways
- When restoring rusty tools, first check if a tool is really worth the effort. Sometimes, there’s just not enough metal left.
- Vinegar is a cheap and easy way to remove rust. Just soak the tool and let the acetic acid do the work.
- Electrolysis uses electricity to remove rust. It’s effective but needs a bit more setup than a simple vinegar soak.
- Vinegar is gentler and less likely to harm the base metal compared to stronger chemical rust removers, but can pit metal if left too long.
- After removing rust, always rinse, dry thoroughly, and apply a protective coating to stop rust from coming back.
Assessing Tools For Restoration
Before you even think about grabbing a wire brush or a bucket of vinegar, the very first step in bringing old tools back to life is a good, honest look at what you’ve got. Not every rusty relic is a candidate for a full makeover, and knowing which ones are worth the effort saves you time and frustration. It’s about figuring out if the tool has enough of its original self left to be useful again.
Determining If A Tool Is Worth Saving
This is where you need to be realistic. Sometimes, a tool is just too far gone. Heavy pitting, where the metal has corroded away leaving deep holes, can weaken the tool significantly. If removing the rust would mean removing too much of the original metal, the tool might end up looking more like a shadow of its former self than a functional item.
Think about the tool’s purpose. A chisel with a severely pitted edge might never hold a fine sharpness again. An axe head with deep pitting might become dangerously weak. It’s a tough call, but sometimes the best place for a tool that’s beyond saving is on the wall as a display piece, a reminder of its past life.
Here are a few things to consider:
- Metal Loss: How much of the original metal has actually corroded away? Look for deep pitting versus surface rust.
- Structural Integrity: Is the tool still strong enough for its intended use? Check for cracks or thin spots caused by rust.
- Value vs. Effort: Is the tool rare, historically significant, or does it hold sentimental value? Sometimes, the effort is justified even if the tool isn’t perfect.
- Functionality: Even after rust removal, will the tool be able to perform its original task effectively?
Disassembling Complex Tools Before Treatment
For tools that aren’t just a single piece of metal – think things with handles, multiple parts, or intricate mechanisms – taking them apart is usually a good idea. Trying to clean a complex tool while it’s still assembled can mean rust hiding in places you can’t reach. Plus, different materials (like wood handles) might need different cleaning methods than the metal parts. Disassembly allows for a more thorough cleaning of each component and makes it easier to inspect for damage. It’s also a great way to learn how the tool works, which is part of the fun of restoring antique tools. Just be sure to keep track of all the little screws and parts; a labeled baggie or a simple diagram can be a lifesaver. This careful preparation is key to finding the best methods for antique tool restoration.
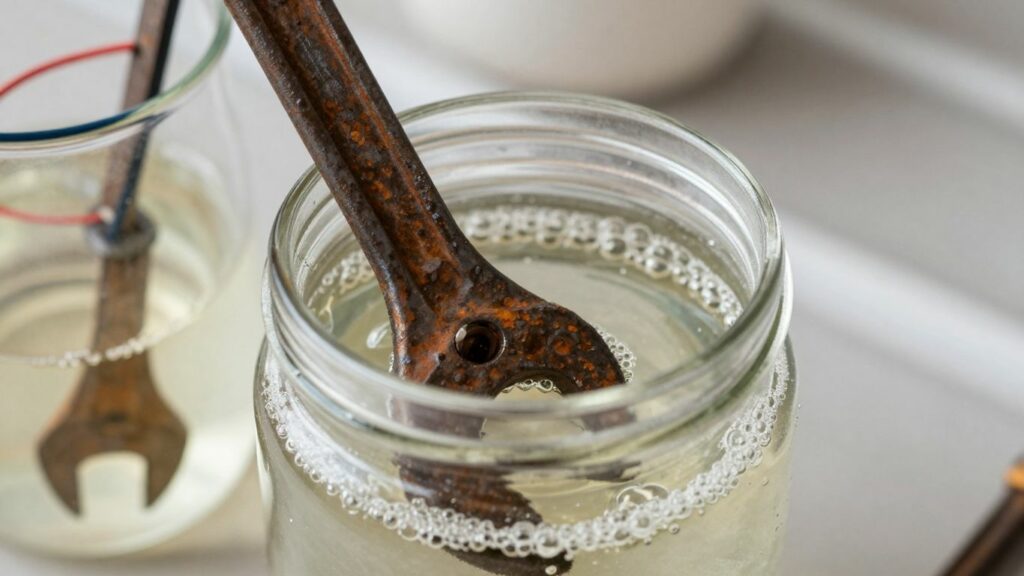
Vinegar: A Kitchen Staple For Rust Removal
Sometimes, the best solutions are hiding in plain sight, right there in your kitchen pantry. Plain old white vinegar, that is. It’s a surprisingly effective and incredibly budget-friendly way to tackle rust on your tools. You know, for those times when you’re wondering how to remove rust from tools without spending a fortune.
The Gentle Power Of Acetic Acid
White vinegar is mostly acetic acid, and this mild acid is what does the heavy lifting. It’s not as harsh as some industrial rust removers, which is a good thing. You don’t want something that’s going to eat away at the good metal along with the rust.
This makes it a great option for cleaning old tools with vinegar, especially if they’re not in terrible shape. It works by slowly dissolving the iron oxide – that’s rust – without usually damaging the underlying steel. It’s a patient process, but the results can be pretty satisfying.
Simple Submersion For Effective Cleaning
Using vinegar for rust removal is pretty straightforward. You don’t need a fancy setup or special equipment. The basic idea is to submerge the rusty tool in vinegar. Here’s a general rundown:
- Prep the tool: Give it a quick brush to get rid of any loose dirt or flaky rust. This helps the vinegar get to the tougher stuff.
- Submerge: Place the tool in a container filled with enough white vinegar to cover it completely. Make sure the container won’t be damaged by the vinegar – glass or sturdy plastic usually works fine.
- Wait and Watch: Let the tool soak. The time needed really depends on how rusty it is. For light rust, a few hours might do it. For heavier rust, you might need to leave it overnight. You’ll often see small bubbles forming, which means the acid is working.
- Check Progress: Every so often, pull the tool out and give it a scrub with a brush or some steel wool. This helps remove the loosened rust. Rinse it off and put it back in if needed.
- Rinse and Dry: Once you’re happy with the rust removal, rinse the tool thoroughly with clean water. Then, dry it immediately and completely. This is super important to prevent new rust from forming right away.
Cost-Effectiveness And Reusability
One of the biggest wins for vinegar is its price. A gallon of white vinegar is usually pretty cheap, often less than a couple of dollars. This makes it a fantastic DIY tool rust treatment option, especially if you have a lot of tools to tackle or if you’re on a tight budget. Plus, you can often reuse the vinegar. As long as it’s not completely saturated with rust and gunk, you can strain it and use it again for less critical jobs or for subsequent tool cleanings. Just keep in mind that after several uses, its effectiveness will decrease.
Electrolysis: Harnessing Electricity For Rust Removal
Understanding The Electrolytic Process
Electrolytic rust removal for metal is a pretty neat trick that uses electricity to get rid of rust. It sounds complicated, but it’s basically a controlled chemical reaction. You’ve got your rusty item, a container of water with an electrolyte (like washing soda), a power source (usually a battery charger), and a piece of scrap metal that’s not going to rust.
The rusty item is connected to the negative side of the power source, and the scrap metal is connected to the positive side. When you turn it on, electricity flows through the water, and the magic happens. The rust is essentially pulled off the tool and onto the scrap metal. It’s a bit like a magnet, but for rust.
Advantages Over Chemical Soaks
Compared to just soaking tools in something like vinegar, electrolysis has some real perks. For starters, it’s generally faster, especially for heavily rusted items. It also tends to be gentler on the base metal itself. While acids can eat away at the good metal along with the rust, electrolysis is more targeted.
Plus, you don’t have to worry about fumes like you might with some stronger chemical rust removers. It’s also pretty good at getting into nooks and crannies that might be hard to reach with a brush or cloth.
Setting Up A Home Electrolysis Rig
Getting started with electrolysis at home isn’t too difficult. You’ll need a few things:
- A container: A plastic tub or bucket works fine. Make sure it’s big enough for your tool.
- An electrolyte solution: Washing soda (sodium carbonate) dissolved in water is a popular choice. Avoid using table salt, as it can create harmful fumes.
- A power source: A manual car battery charger is a common option. You’ll need to make sure it’s a manual one, not an automatic one that shuts off.
- Scrap metal: This will act as your anode. Steel rebar or an old piece of angle iron works well. It should not be the same metal as your tool.
- Wiring: You’ll need some insulated wire to connect everything.
Here’s a basic setup guide:
- Fill the container: Mix your electrolyte solution with water. Don’t fill it so high that it will spill when you put your tool in.
- Add the anode: Suspend your scrap metal in the container, making sure it doesn’t touch the tool you’re working on. You can use wire or clamps to hold it in place.
- Connect the power: Attach the positive lead from your charger to the scrap metal (anode) and the negative lead to your rusty tool (cathode). Make sure the connections are secure.
- Power up: Plug in the charger and turn it on. You should start to see bubbles forming on both the tool and the scrap metal. Let it run until the rust is gone. This can take a few hours or even a day or two, depending on how bad the rust is.
Comparing Vinegar And Electrolysis Methods
So, you’ve got a rusty old tool and you’re wondering which method is going to get it looking good as new. It’s a fair question, and honestly, there’s no single ‘best’ answer for every situation. Both vinegar and electrolysis have their own strengths and weaknesses, and what works great for one tool might not be ideal for another.
Effectiveness On Different Rust Levels
When it comes to light surface rust, both methods can do a pretty good job. Vinegar, with its acetic acid, will slowly eat away at the rust. Electrolysis, on the other hand, uses an electrical current to essentially reverse the oxidation process, pulling the rust off.
For heavier, more stubborn rust, electrolysis usually pulls ahead. It’s a more aggressive process and can break down thicker layers of rust more effectively. Vinegar might take a very long time, or multiple soaks, to tackle really deep rust, and you might end up with some pitting left behind.
Impact On Parent Metal
This is where electrolysis really shines. The beauty of the electrolytic process is that it’s designed to target the rust (iron oxide) specifically. It doesn’t really attack the underlying metal itself. You might get a black oxide coating after electrolysis, but that’s usually just a surface layer that can be scrubbed off. Vinegar, while generally safe, is an acid. If left too long, especially on more delicate or finely machined parts, it can start to etch into the parent metal, causing pitting or a dulling of the surface.
Ease of Use and Safety
Vinegar is incredibly simple. You just submerge the tool, wait, and check on it. It’s readily available, cheap, and relatively safe to handle. The main downside is the time it can take, and the smell can be a bit much for some people.
Electrolysis requires a bit more setup. You need a power source (like a battery charger), a container, an electrolyte solution (like washing soda), and a sacrificial anode. There are electrical components involved, so you need to be mindful of safety, especially with water and electricity. It’s not inherently dangerous if done correctly, but it does involve more steps and a bit more knowledge to get right. Plus, you’ll need to scrub off that black coating afterward, which is an extra step vinegar doesn’t usually require.
Post-Restoration Care And Prevention
So, you’ve put in the work, and your tools are looking great again. Awesome! But don’t stop now. The job isn’t quite finished. You’ve got to take care of them so all that effort doesn’t go to waste. Rust can sneak back in pretty fast if you’re not careful, especially after a good cleaning.
Thorough Rinsing And Drying Techniques
After you’ve finished your vinegar soak or electrolysis, the very first thing you need to do is rinse everything really well. If you used vinegar, you want to get all that acetic acid off. A quick dip in clean water is usually good, but for really thorough cleaning, a rinse under running water works even better. Some folks like to use a baking soda and water solution for a final rinse. This helps to neutralize any leftover acid, which is a good idea if you want to be extra sure.
Then comes drying. This is super important. You can’t just let them air dry. Moisture is the enemy here. Pat them down with clean rags or paper towels right away. For nooks and crannies, a blast of compressed air can be a lifesaver. The goal is to get them bone dry as quickly as possible. Leaving any dampness behind is just inviting rust to start forming again, sometimes within minutes.
Applying Protective Coatings
Once your tools are clean and completely dry, it’s time to put a shield on them. This is where you stop rust before it even thinks about coming back. There are a few good options here:
- Light Oil Coat: A thin layer of mineral oil or a dedicated tool oil is a classic choice. It’s cheap, easy to apply, and does a good job of keeping moisture away from the metal. Just wipe it on with a clean cloth.
- Paste Wax: For a bit more protection, especially on surfaces that don’t get a lot of friction, paste wax can be great. It leaves a nice, protective film.
- Specialized Coatings: Products like Boeshield T-9 or Fluid Film are designed specifically for rust prevention. They often contain lanolin or other compounds that offer long-lasting protection and can even act as a lubricant.
Choose what works best for you and the tool. The main thing is to get something on that bare metal.
Storing Restored Tools Properly
Where you keep your tools matters just as much as how you treat them. Even with a good protective coating, storing them in a damp environment is asking for trouble.
- Dry Location: Find a spot that’s as dry as possible. Avoid basements or garages that tend to be humid. A dry cabinet or toolbox is ideal.
- Avoid Contact: If possible, store tools so they aren’t touching each other, especially if they have different metal finishes. This can prevent galvanic corrosion.
- Regular Checks: It’s not a bad idea to give your restored tools a quick look-over every few months. Catching any early signs of rust is much easier than dealing with a full-blown problem later on.
Frequently Asked Questions
Is vinegar safe for all types of metal tools?
Vinegar is generally safe for most common metals like iron and steel. However, if left for too long, the acetic acid in vinegar can start to eat away at the metal itself, causing pitting. It’s best to check on your tools regularly during the soaking process.
How long should I soak my tools in vinegar?
The time needed depends on how rusty the tool is. Light rust might disappear in a few hours, while heavily rusted items could need to soak overnight or even longer. Keep an eye on it – you want to remove the rust, not the metal!
What is electrolysis for rust removal?
Electrolysis uses electricity and a special solution to remove rust. You put the rusty item in a liquid, connect it to a power source, and the electricity helps lift the rust off the metal and onto another piece of metal.
Is electrolysis better than vinegar?
Electrolysis can be very effective and doesn’t eat into the parent metal like acid can. However, setting up an electrolysis rig can be more complicated than just using vinegar. For many common rust issues, vinegar is simpler and works great.
What should I do after removing rust?
After getting rid of the rust, it’s super important to rinse the tool thoroughly with clean water and dry it completely right away. Then, apply a light coat of oil or a protective wax to prevent new rust from forming.
Can I use these methods on tools with wooden parts?
It’s best to remove wooden handles or parts before treating the metal with vinegar or electrolysis. Both methods involve liquids that can damage or discolor wood. If you can’t remove them, be very careful to keep the wood dry and away from the rust-removing solution.