10 Simple Ways On How To Knot A Tie Step By Step (Photos)

Suddenly your dad was offered a job in a respectable firm, a husband was called for an urgent meeting, and brother got late for a friend’s wedding? That’s a moment where you are to show your skills on how to knot a tie. And here we will not only speak but also show how to knot a tie with pictures.

10 Simple Ways On How To Knot A Tie Step By Step (Photos)

HOW TO KNOT A TIE STEP BY STEP

We will explain to you how to tie the most popular tie knots and pictures will help you visually to understand the process. Are you ready? Let’s begin then.

1. KENT KNOT

This one is suitable for all types of neckties and collars.

EASY INSTRUCTION:

  1. Place the tie so that the wide part is to the left hand and the narrow is to the right hand.
  2. Put the wide end under the narrow one to form a crosshair.
  3. Wrap the narrow side with the wide from left to right.
  4. Pull the wide end to the neck and hang it under the tie collar.
  5. Stretch it through the loop on the front side that just formed.
  6. Pull the wide end down and slightly tighten it.

2. WINDSOR KNOT

This one has an entirely symmetrical form of a triangle.

EASY INSTRUCTION:

  1. Place the tie with the seams inside so that the wide part is to the right hand and the narrow is to the left hand. The small end should be slightly pulled above your navel.
  2. Put the wide end over the narrow one to form a crosshair.
  3. Pull the wide end to the neck and hanger it over the tie collar.
  4. After wrapping the tie collar once, pull it to the left.
  5. Put under the narrow end from left to right.
  6. Pull the wide end to the neck again and hang it over the formed tie collar.
  7. Then pull the wide end to the right.
  8. Make the front side of the tie knot and put the wide side horizontally from right to left.
  9. Pull the wide end to the neck and hang it under the tie collar.
  10. Stretch it through the loop on the front side of the tie knot that has formed during the 8th step.
  11. Pull the wide end down and slightly tighten it.

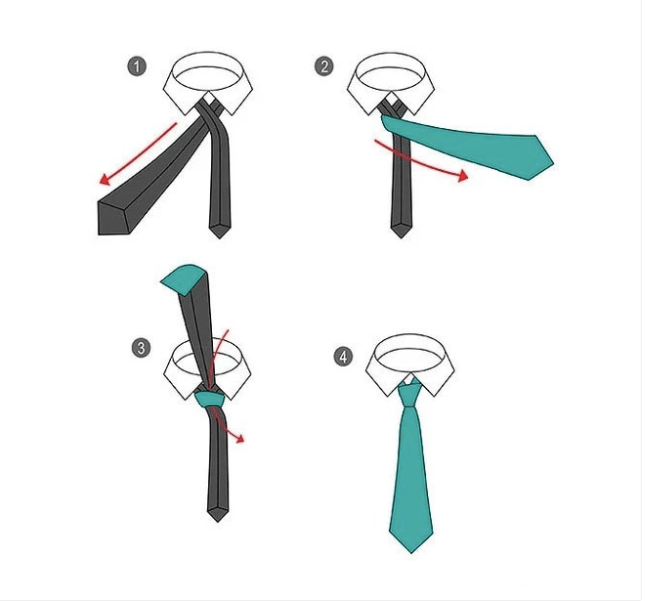
3. FOUR-IN-HAND KNOT

Perhaps the most common of all, because of its simplicity and versatility. It is easy to tie, of a conical shape, and slightly asymmetric.

EASY INSTRUCTION:

  1. Place the tie with the seams inside so that the wide part is to the right hand and the narrow is to the left hand. The small end should be slightly pulled above your navel.
  2. Put the wide end over the narrow one to form a crosshair.
  3. Wrap the narrow side with the wide one from right to left.
  4. Make the front side of the tie knot and put the wide side horizontally from left to right.
  5. Pull the wide end to the neck and hang it under the tie collar.
  6. Stretch it through the loop on the front side of the tie knot that has formed during the 4th step
  7. Pull the wide end down and slightly tighten it.

4. HALF WINDSOR KNOT

Someone may say that a Windsor knot is needless since there is a Half Windsor Knot. All because it is simpler than its “older brother” and looks much more elegant due to its asymmetric form. It is also a formal knot, which suits most types of collars and can be used on all types of ties.

5. VICTORIA KNOT

This one is often called a “four-in-hand knot” with an extra turn, because the tie end is wrapped four times around the knot, and then stretch inside. As a result, it looks wide, but still ideally suits the office shirts.

6. DIAGONAL KNOT

This one is easy to make after you have already learned how to make all the previous knots. The Diagonal knot consists of two layers, it is asymmetric and hard to take off, and so you will need to untie it. But it looks very elegantly on a deep color tie.

7. KELVIN KNOT

This knot is named after Lord Calvin, the temperature school inventor. However, it is not directly related to Lord Calvin, but it as hard to tie as to understand this scientist’s theories. Nevertheless, it looks fabulous and elegant on thin cotton or wool ties and is better to wear at some special events.

8. BALTHUS KNOT

This is one of the widest knots, which was invented by the Swiss artist Baltasar Klossowski in the last century. The artist wore it in an unusual manner, making the wide end short and the narrow one long. Balthus knot is ideal for men who are not too tall, since it conceals the tie length and levels the costume proportions. It looks lovely on light silk ties.

9. ONASSIS KNOT

Aristotle Onassis invented this knot, a Greek businessman, and Jackie Kennedy’s second husband. He changed the classic “four-in-hand knot”, freely pulling the wide end of the tie instead of fixing it. This knot looks very eccentric and fits perfectly the women fashion also. Such a knot fits ties with bright and interesting prints.

10. PRATT KNOT

The most popular knot in America, almost all local businessmen and politicians prefer it. It is unassuming and quite simple to tie. However, one should remember that it is tied up with an outer seam, and the shirt collar is meant to hide it.

Learning how to make a tie step by step is important for both men and women, especially these days that men’s fashion is increasingly being borrowed by women. Also, see related video on how to knot a tie below and share your experience with others!


Exit mobile version