


Encountering a tire blowout while driving can be a nerve-wracking experience. Whether it’s due to impact damage, a large cut with rapid air loss, or a slow puncture, a flat tire can leave you feeling overwhelmed on the road. However, there’s no need to panic. By following these seven simple steps, you can quickly switch to your spare tire and safely make your way home or to the nearest tire shop.
Before You Begin
Safety is of utmost importance when dealing with a flat tire. Find a safe location to park your vehicle, even if it means driving a bit further, to avoid stopping in hazardous areas, such as narrow roads. Turn on your hazard lights, put on a reflective jacket, and place a warning triangle to alert other drivers of your presence.
Consider your car’s manual for specific advice before starting the tire-changing process.
Necessary Equipment
To successfully change your flat tire, gather the following tools:
- Wrench: This will be used to remove the wheel nuts.
- Jack: Necessary for lifting the car off the ground.
- Wheel Chock: Prevents the car from rolling when it’s jacked up (bricks can be used as an alternative).
- Wheel Nut Key: In case your vehicle has locking nuts.
- Car Handbook: Keep it handy for reference, especially on proper jacking points.
It’s also a good idea to have some additional items on hand:
- Torch: Useful for nighttime work (check and replace batteries regularly).
- Gloves: Keep your hands clean from dirt and grime.
- Reflective Jacket: Ensures you remain visible for added safety.
- Warning Triangle: Warns other drivers of a hazard or obstruction.
- Short Plank of Wood: Provides a flat surface to stabilize the jack.
- Tyre Pressure Gauge: Allows you to check the new tire’s inflation.
Steps for Changing a Flat Tire
- Find a Safe SpotAs soon as you notice a flat tire, safely pull over to the side of the road. Make sure no other vehicles are in immediate danger of running into you. Exit the car carefully and inspect the tire for damage.
- Locate Your Spare Tire, Jack, and Tire IronYour car’s spare tire, jack, and tire iron are essential components for changing a flat. In most cases, the spare tire is stored beneath the floor mat in the trunk. However, if you have an SUV, minivan, or pickup truck, the spare tire might be mounted on the back of the tailgate or under the vehicle.Once you find the spare tire, take it out and check its air pressure with a gauge. Ensure that the spare tire is in good condition and properly inflated.
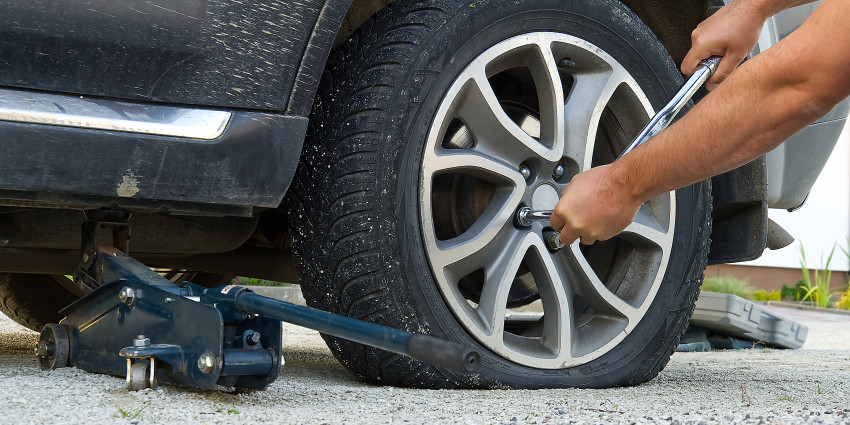
- Loosen the Wheel LugsWith the tire iron, loosen each wheel lug by turning them counterclockwise. Be prepared for them to be tight, requiring some effort. The objective is to make the lugs loose; you don’t need to remove them entirely.Ensure that the car is in “Park” (or in gear for manual transmissions) and set the emergency brake. Park the vehicle on a flat surface; avoid changing the tire on slopes or uneven terrain. Use a wheel chock or a heavy object to block the tire opposite to the flat tire, preventing the car from moving when you lift it with the jack.
- Jack Up the CarPosition the jack under the appropriate jacking point specified in the owner’s manual. Use the provided hand crank to raise the jack. Continue raising the car until the flat tire is off the ground completely.
- Remove the Flat TireWith the car lifted, you can now remove the wheel lugs completely. Set the lugs aside in a secure location. Then, carefully take off the flat tire and place it aside.
- Install the Spare TirePosition the spare tire over the wheel studs, lining up the holes in the wheel with the protruding wheel studs on the brake hub. This can be physically demanding, so consider balancing the tire on your foot while aligning it. Jack the car slightly to accommodate the fully inflated spare tire if needed.Once the spare tire is in place, screw each wheel lug back on by hand to ensure they are not cross-threaded. Then, use the tire iron to tighten the lugs until they are snug and the wheel fits flush against the brake hub.
- Lower the Car and Tighten the Wheel Lugs CompletelyCarefully lower the jack and remove it from underneath the car. Now, tighten the wheel lugs completely. While specific torque ratings exist for tightening the lugs, the tire iron may not provide that precision. Tighten the lugs as much as possible to ensure they are secure.
Congratulations! You’ve successfully replaced your flat tire with the spare one. Don’t forget to store the flat tire back where the spare tire was placed and securely put away the jack and tire iron. Remember that compact spare tires are smaller than regular ones, so fitting the flat tire into the spare tire well might not be possible. Make sure to visit a tire shop to repair or replace the flat tire as soon as possible.
Remember, learning how to change a tire is a valuable skill for any driver. Practice changing a tire in a controlled environment, like your driveway, to become more confident and efficient when faced with a flat tire on the road. Stay safe and prepared!