Creating professional documents requires attention to detail, accuracy, and consistent formatting. A well-organized layout sets the tone for your content and improves readability. Microsoft Word’s ruler feature is essential for achieving these professional standards.
The ruler in Microsoft Word serves as your digital measuring tape, giving you precise control over:
- Document margins
- Paragraph indentation
- Tab positions
- Column widths
- Table dimensions
This built-in feature transforms your document creation process from guesswork to exact measurements. Whether you’re working on business reports, academic papers, or creative content, the ruler helps maintain consistency throughout your documents.
Professional documents need balanced spacing and alignment – factors directly affecting how your audience views your work. A properly formatted document using the ruler tool shows attention to detail and professionalism. It ensures your content looks exactly as you want, both on screen and in print.
The ruler feature controls your document’s visual structure, helping you create layouts that grab attention and uphold professional standards across all your Microsoft Word documents.
The Ruler in Microsoft Word
The ruler in Microsoft Word is a precise measurement tool that displays along the top and left sides of your document window. This visual guide helps you control the physical layout of your document’s elements with pixel-perfect accuracy.
Key Components of the Word Ruler:
- Horizontal Ruler – Spans across the top of your document, measuring width
- Vertical Ruler – Runs down the left side in Print Layout view, measuring length
- Margin Markers – Gray-shaded areas indicating document margins
- Tab Markers – Small L-shaped indicators for text alignment points
Word offers two measurement systems for the ruler:
Inches (Imperial)
- Default setting in US versions
- Marked in 1/8-inch increments
- Ideal for US standard paper sizes
Centimeters (Metric)
- Common in international versions
- Marked in 0.5cm increments
- Better suited for A4 and other metric paper sizes
You can switch between measurement systems through:
- File > Options > Advanced
- Display > Show measurements in units of
- Select your preferred measurement system
The ruler’s measurements directly affect your layout choices by providing visual reference points for:
- Setting exact paragraph indentations
- Creating consistent spacing between elements
- Positioning graphics and text boxes
- Establishing uniform column widths
- Aligning text across multiple pages
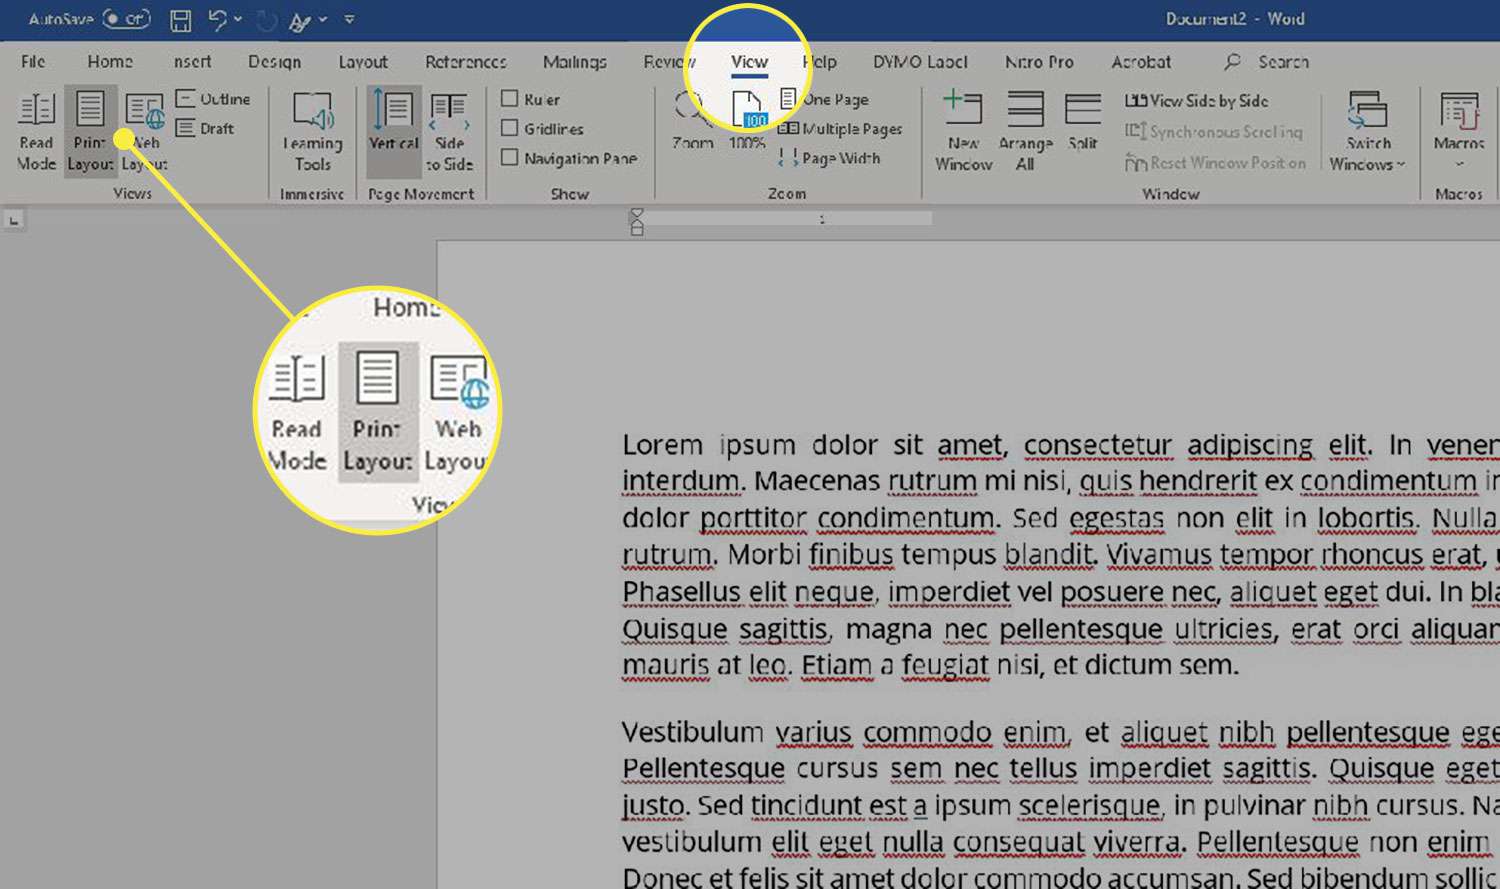
Enabling the Ruler in Different Layouts
Microsoft Word offers two primary layout views for displaying the ruler: Print Layout and Draft Layout. Each view provides distinct ruler functionalities to enhance your document formatting experience.
Print Layout View Setup:
- Click the “View” tab in the Microsoft Word ribbon
- Select “Print Layout” from the available options
- Look for the “Show” group in the ribbon
- Check the “Ruler” box to display both horizontal and vertical rulers
Draft Layout View Setup:
- Navigate to the “View” tab
- Click “Draft” in the views section
- Check the “Ruler” box in the “Show” group
- A horizontal ruler appears at the top of your document
Key Differences Between Layouts:
- Print Layout displays both horizontal and vertical rulers
- Draft Layout shows only the horizontal ruler
- Print Layout provides a complete page view with margins
- Draft Layout focuses on text content without page formatting elements
Ruler Display Options:
- Horizontal ruler shows measurements from left to right
- Vertical ruler (Print Layout only) displays measurements from top to bottom
- Both rulers update dynamically as you adjust document formatting
- Rulers maintain visibility across multiple pages in your document
The ruler’s display remains consistent unless manually disabled, allowing you to maintain precise formatting throughout your editing session. You can toggle the ruler on or off at any time using the checkbox in the View tab, regardless of your chosen layout view.
Using the Ruler for Document Formatting
Setting the right margins is essential for creating professional-looking documents. Well-proportioned margins make your text easier to read and give your document a polished look that grabs the reader’s attention.
How to Set Margins with the Ruler Tool
The ruler tool allows you to control the margins of your document visually. Here’s how to use it effectively:
Adjusting the Left Margin
- Find the gray-white boundary on the left side of the horizontal ruler
- Move your cursor over the margin marker until it changes into a double-headed arrow
- Click and drag to adjust the width of the left margin
- Release when you reach your desired measurement
Adjusting the Right Margin
- Locate the margin marker on the right end of the ruler
- Hover until you see the double-headed arrow cursor
- Drag left or right to set your preferred width for the right margin
Recommended Margin Sizes for Different Types of Documents
Here are some general guidelines for setting margins based on the type of document you’re working on:
- Standard business documents: 1-inch margins on all sides
- Academic papers: 1.5-inch left margin for binding purposes
- Marketing materials: 0.5 to 0.75-inch margins for modern layouts
- Newsletters: 0.75-inch margins to maximize content space
The ruler displays measurements in either inches or centimeters, depending on your system’s default units. If you need precise measurements, pay attention to the measurement guide as you drag the margin markers. This will help ensure consistency throughout your document and create a professional layout that keeps readers engaged.
Creating Tabs with Precision Using the Ruler
Tabs are essential alignment guides in Microsoft Word, allowing you to create professional-looking documents with perfectly aligned text. These invisible markers help you position text at specific points across your page, creating neat columns, lists, or indented paragraphs.
Types of Tabs Available in Word:
- Left Tab – Aligns text to the right of the tab stop
- Center Tab – Centers text on the tab stop
- Right Tab – Aligns text to the left of the tab stop
- Decimal Tab – Aligns numbers around a decimal point
- Bar Tab – Creates a vertical line at the tab position
Creating Tabs Using the Ruler:
- Click the tab selector at the ruler’s left end to choose your desired tab type
- Click directly on the horizontal ruler where you want to place the tab
- Press the Tab key on your keyboard to move your cursor to that position
- Type your text – it will align according to the tab type you selected
Adjusting Tab Positions:
- Click and drag existing tab markers along the ruler to fine-tune their position
- Double-click any tab marker to open the Tabs dialog box for precise measurements
- Right-click a tab marker and select “Clear Tab” to remove it
Pro Tip: Hold the Shift key while dragging tabs to see exact measurements displayed in a small popup window, helping you achieve pixel-perfect alignment.
The ruler’s tab functionality shines when creating structured documents like forms, tables of contents, or financial reports where precise text alignment is crucial for readability and professional appearance.
Additional Features That Enhance Your Experience with The Ruler Tool
When paired with complementary Microsoft Word features, the ruler tool becomes even more powerful.
1. Use Gridlines for Precise Alignment
Gridlines are invisible guides that create a precise alignment framework across your document. You can activate gridlines by checking the View tab’s Gridlines box next to the Ruler option. These lines create a graph paper-like overlay that helps you:
- Position images with pixel-perfect accuracy
- Align text boxes and shapes consistently
- Create symmetrical layouts across multiple pages
2. Utilize the Navigation Pane for Consistent Formatting
The Navigation Pane adds another layer of precision to your document layout work. This tool displays your document’s structure through:
- A hierarchical view of headings
- Thumbnail previews of each page
- Quick navigation options for different sections
The Navigation Pane helps you maintain consistent spacing and formatting throughout lengthy documents when used with the ruler. You can drag and drop sections while keeping an eye on the ruler measurements to ensure uniform layout standards across your document.
Practical Applications: Real-World Examples Of Effective Document Layouts
Let’s explore real-world examples where the ruler tool transforms ordinary documents into professionally formatted masterpieces:
1. Business Proposals
- Create perfectly aligned financial tables with decimal tabs
- Set consistent paragraph indentations at 1-inch marks
- Design clean, balanced margins (1.25″ on all sides) for a professional appearance
2. Academic Papers
- Structure hanging indents for citation lists at 0.5″
- Position block quotes with 1″ indentation from both margins
- Align chapter headings precisely at 1.5″ from the left margin
3. Marketing Materials
- Design two-column layouts with exact spacing
- Create newsletter headers with strategically placed tabs
- Set up price lists with right-aligned numbers
4. Legal Documents
- Position numbered paragraphs with 0.75″ indentation
- Create signature lines at specific ruler marks
- Establish consistent section breaks with measured spacing
5. Resume Designs
- Align dates and job titles using right tabs
- Create balanced margins (1″ top/bottom, 1.25″ sides)
- Position section headers with precise spacing
These examples demonstrate the ruler tool’s versatility in creating perfect document layouts. A resume with precisely aligned dates appears more professional than one with inconsistent spacing. Legal documents with uniform paragraph indentations convey attention to detail. Marketing materials with balanced columns engage readers effectively.
You can replicate these layouts by:
- Setting your ruler measurements before starting
- Creating tab stops for consistent alignment
- Adjusting margins to match your document type
- Testing the layout with sample text
- Saving your settings as templates for future use
Troubleshooting Common Issues When Working With The Ruler Tool
The ruler tool can occasionally present challenges. Here’s a quick guide to resolve common issues:
Ruler Not Displaying
- Switch to Print Layout view from the View tab
- Verify the Ruler checkbox is selected in the Show group
- Press Alt + W + R as a keyboard shortcut to toggle the ruler
Ruler Shows Wrong Measurements
- Check File > Options > Advanced > Show measurements in units of
- Adjust between inches, centimeters, or points based on your needs
Ruler Appears Grayed Out
- Exit Protected View if you opened the document from the internet
- Click “Enable Editing” at the top of your document
- Save the file to a trusted location on your computer
Inconsistent Ruler Behavior
- Clear Word’s cache by closing all documents
- Reset Word to default settings through File > Options > Advanced > Reset
- Restart Microsoft Word completely
Display Resolution Issues
- Adjust your screen’s display scaling in Windows settings
- Update your graphics drivers
- Set Word’s zoom level to 100%
Mastering Document Layouts With The Help Of The Ruler Tool In Microsoft Word
The ruler tool in Microsoft Word transforms your document creation process from basic text editing to professional layout design. You’ve learned the essential steps to enable and utilize this powerful feature across different view modes. Your newfound knowledge of margin adjustments, tab placements, and measurement options puts you in control of creating polished, well-structured documents.
Take time to experiment with the ruler tool in your next Word project. Try combining different margin settings, test various tab alignments, and explore how the ruler complements other formatting features. Each document you create becomes an opportunity to refine your layout skills.
Ready to start? Open Microsoft Word, enable the ruler, and watch your documents transform into professionally formatted masterpieces. Your attention to precise layouts will make your work stand out and reflect your commitment to quality presentation.
FAQs (Frequently Asked Questions)
What is the importance of document layout in Microsoft Word?
Document layout is crucial for creating professional-looking documents. A well-structured layout enhances readability and ensures that the content is presented clearly, making it more effective in conveying information.
How can I enable the ruler in Microsoft Word?
To enable the ruler in Microsoft Word, go to the View tab on the ribbon and check the ‘Ruler’ option. This will display the ruler at the top and side of your document, allowing you to measure and format elements accurately.
What are tabs in Microsoft Word and how can I create them using the ruler?
Tabs act as alignment guides within paragraphs or sections of text. To create tabs using the ruler, click on the desired position on the ruler where you want to set a tab stop. You can then adjust these tabs by dragging them along the ruler.
What are some common issues when working with the ruler tool in Word?
Common issues include not being able to see the ruler or it not displaying correctly. Quick fixes involve checking your view settings to ensure that ‘Ruler’ is enabled under the View tab, or restarting Word if problems persist.
How do I adjust margins using the ruler in Microsoft Word?
To adjust margins using the ruler, simply drag the left and right margin markers on the horizontal ruler at the top of your document. This allows precise control over your document’s layout and ensures balanced formatting.
Can gridlines enhance my experience with the ruler tool?
Yes, gridlines provide visual reference points throughout your document, complementing the use of rulers for better alignment and spacing. They help maintain consistency while organizing content hierarchically.
Discussion about this post